IMAP Mail Client Setup: Difference between revisions
imported mail client guide to wiki - thunderbird only |
No edit summary |
||
| (51 intermediate revisions by 9 users not shown) | |||
| Line 1: | Line 1: | ||
[[Category:Email]] | |||
==Overview== | ==Overview== | ||
The CSEE mail servers use a secure connection for incoming and outgoing mail; so you will need to customize your mail client in order to read and send e-mail on your CSEE account. This page explains how to configure your e-mail client for the CSEE Mail Services. This page will discuss Thunderbird | The CSEE mail servers use a secure connection for incoming and outgoing mail; so you will need to customize your mail client in order to read and send e-mail on your CSEE account. This page explains how to configure your e-mail client for the CSEE Mail Services. This page will discuss Thunderbird. If you use a different client, please refer to your client's documentation. You will need to set up your client for the following services:<br/> | ||
<br/> | <br/> | ||
{| border="1" align="center" | {| border="1" align="center" class="prettytable" | ||
! '''Service''' | |||
! '''Server name''' | |||
! '''Port''' | |||
|- | |- | ||
|Secure IMAP | |Secure IMAP | ||
| Line 20: | Line 21: | ||
|} | |} | ||
<br/> | <br/> | ||
<!-- | |||
'''Note:''' For Thunderbird and Microsoft Outlook, the same installation steps can be followed for both IMAP and POP server types. Outlook Express, however, must be configured to use POP. (see below) | '''Note:''' For Thunderbird and Microsoft Outlook, the same installation steps can be followed for both IMAP and POP server types. Outlook Express, however, must be configured to use POP. (see below) | ||
'''Update 10/5/2010:''' Port 25 may no longer work for off-campus connections from the Verizon network. The work-around is to port 587 for SMTP instead. | |||
--> | |||
==Thunderbird (Windows/ | ==Thunderbird (Windows/MacOS/Linux)== | ||
If you' | #If you have no email accounts configured the 'New Account' dialog will automatically open. [[:File:Thunderbird-1.png|[1]]]<br />If you already have accounts in Thunderbird and are simply adding CSEE mail to Thunderbird open the 'New Account' dialog by clicking on the 3 horizontal bars (menu button) and select 'Preferences' -> 'Account Settings...' then 'Account Options' -> 'Add Mail Account' [[:File:Thunderbird-2.png|[2]]] | ||
#Fill in your name, csee username and your password. Thunderbird will attempt to automatically detect the proper settings, but it will not work. Manually, change the settings. [[:File:Thunderbird-3.png|[3]]] | |||
{| class="prettytable" | |||
! | |||
!Server Hostname | |||
!Port | |||
!SSL | |||
!Authentication | |||
|- | |- | ||
| | |IMAP||imap.cs.umbc.edu||993||SSL/TLS||Normal Password | ||
| | |||
|- | |- | ||
| | |SMTP||smtp.cs.umbc.edu||587||STARTLS||Normal Password | ||
|} | |||
<ol start="3"> | |||
<li>If the 'Done' box becomes grayed out, click in one of the 'Authentication' boxes and select 'Normal Password' again. This should re-enable the button.</li> | |||
</ol> | |||
Email is now set up--check for new messages by clicking the "Get Mail" button. | |||
<gallery> | |||
File:Thunderbird-1.png|New Account dialog when no accounts are configured | |||
File:Thunderbird-2.png|How to access the New Account dialog with existing accounts are in Thunderbird | |||
File:Thunderbird-3.png|All the settings in their respective fields | |||
</gallery> | |||
=== Adding LDAP support === | |||
Adding LDAP support allows Thunderbird to auto-complete email address of people who are in the UMBC system. | |||
# Access the menu, the three horizontal bars in the upper right -> preferences -> preferences [[:File:Thunderbird-ldap-1.png|[1]]] | |||
# Select the "Composition" tab and then the "Addressing" sub-tab. Click on "Edit Directories..." [[:File:Thunderbird-ldap-2.png |[2]]] | |||
# Select "Add" to add a new LDAP server. | |||
# Fill in the following information [[:File:Thunderbird-ldap-3.png|[3]]] | |||
[[ | #: Name: UMBC LDAP | ||
#: Hostname: directory.umbc.edu | |||
#: Base DN: dc=umbc,dc=edu | |||
# Click "OK" on the "Directory Server Properties" window | |||
# Click "OK" on the "LDAP Directory Servers" window | |||
# Make sure that the checkbox next to "Directory Server" is checked and make sure that the drop down says "UMBC LDAP" [[:File:Thunderbird-ldap-4.png|[4]]] | |||
# Click "OK" | |||
That's its, you are all set up for LDAP | |||
<gallery> | |||
Thunderbird-ldap-1.png | Accessing the preferences | |||
Thunderbird-ldap-2.png | The "Addressing" sub-tab under the "Composition" tab | |||
Thunderbird-ldap-3.png | The required settings for LDAP | |||
Thunderbird-ldap-4.png | Selecting the new LDAP server | |||
</gallery> | |||
==Alpine== | |||
Alpine's default access method uses direct access to your mail spool in /var/mail. A bug in Linux prevents this from actually working. The solution is to manually configure alpine to use IMAP. | |||
Edit the line beginning with <tt>inbox-path=</tt> and the line beginning with <tt>folder-collections=</tt> in <tt>~/.pinerc</tt> (replace USERNAME with your UMBC username): | |||
inbox-path={imap.cs.umbc.edu/user=USERNAME/ssl/NoRsh/IMAP}inbox | |||
folder-collections=Mail {imap.cs.umbc.edu/user=USERNAME/ssl/NoRsh}[] | |||
Alpine can also use the UMBC LDAP server to search for names and email addresses. This support can be added by editing the line beginning with <tt>ldap-servers=</tt> in <tt>~/.pinerc</tt> (this is all one line): | |||
ldap-servers=directory.umbc.edu:389 "/base=dc=umbc,dc=edu/binddn=/impl=0/rhs=0/ref=0/nosub=0/tls=0/tlsm=0/type=/srch=/time=/size=/cust=/nick=/matr=/catr=/satr=/gatr=" | |||
Every time alpine is run, a prompt will ask for your password to be entered. | |||
Latest revision as of 17:05, 16 September 2026
Overview
The CSEE mail servers use a secure connection for incoming and outgoing mail; so you will need to customize your mail client in order to read and send e-mail on your CSEE account. This page explains how to configure your e-mail client for the CSEE Mail Services. This page will discuss Thunderbird. If you use a different client, please refer to your client's documentation. You will need to set up your client for the following services:
| Service | Server name | Port |
|---|---|---|
| Secure IMAP | imap.cs.umbc.edu | 993 |
| Secure POP | imap.cs.umbc.edu | 995 |
| Secure SMTP | smtp.cs.umbc.edu | 25 |
Thunderbird (Windows/MacOS/Linux)
- If you have no email accounts configured the 'New Account' dialog will automatically open. [1]
If you already have accounts in Thunderbird and are simply adding CSEE mail to Thunderbird open the 'New Account' dialog by clicking on the 3 horizontal bars (menu button) and select 'Preferences' -> 'Account Settings...' then 'Account Options' -> 'Add Mail Account' [2] - Fill in your name, csee username and your password. Thunderbird will attempt to automatically detect the proper settings, but it will not work. Manually, change the settings. [3]
| Server Hostname | Port | SSL | Authentication | |
|---|---|---|---|---|
| IMAP | imap.cs.umbc.edu | 993 | SSL/TLS | Normal Password |
| SMTP | smtp.cs.umbc.edu | 587 | STARTLS | Normal Password |
- If the 'Done' box becomes grayed out, click in one of the 'Authentication' boxes and select 'Normal Password' again. This should re-enable the button.
Email is now set up--check for new messages by clicking the "Get Mail" button.
-
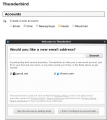 New Account dialog when no accounts are configured
 -
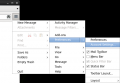 How to access the New Account dialog with existing accounts are in Thunderbird
 -
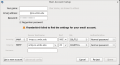 All the settings in their respective fields


Adding LDAP support
Adding LDAP support allows Thunderbird to auto-complete email address of people who are in the UMBC system.
- Access the menu, the three horizontal bars in the upper right -> preferences -> preferences [1]
- Select the "Composition" tab and then the "Addressing" sub-tab. Click on "Edit Directories..." [2]
- Select "Add" to add a new LDAP server.
- Fill in the following information [3]
- Name: UMBC LDAP
- Hostname: directory.umbc.edu
- Base DN: dc=umbc,dc=edu
- Click "OK" on the "Directory Server Properties" window
- Click "OK" on the "LDAP Directory Servers" window
- Make sure that the checkbox next to "Directory Server" is checked and make sure that the drop down says "UMBC LDAP" [4]
- Click "OK"
That's its, you are all set up for LDAP
-
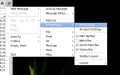 Accessing the preferences
 -
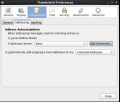 The "Addressing" sub-tab under the "Composition" tab
 -
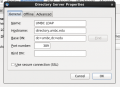 The required settings for LDAP
 -
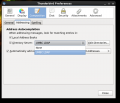 Selecting the new LDAP server


Alpine
Alpine's default access method uses direct access to your mail spool in /var/mail. A bug in Linux prevents this from actually working. The solution is to manually configure alpine to use IMAP.
Edit the line beginning with inbox-path= and the line beginning with folder-collections= in ~/.pinerc (replace USERNAME with your UMBC username):
inbox-path={imap.cs.umbc.edu/user=USERNAME/ssl/NoRsh/IMAP}inbox
folder-collections=Mail {imap.cs.umbc.edu/user=USERNAME/ssl/NoRsh}[]
Alpine can also use the UMBC LDAP server to search for names and email addresses. This support can be added by editing the line beginning with ldap-servers= in ~/.pinerc (this is all one line):
ldap-servers=directory.umbc.edu:389 "/base=dc=umbc,dc=edu/binddn=/impl=0/rhs=0/ref=0/nosub=0/tls=0/tlsm=0/type=/srch=/time=/size=/cust=/nick=/matr=/catr=/satr=/gatr="
Every time alpine is run, a prompt will ask for your password to be entered.