|
|
| Line 70: |
Line 70: |
| Thunderbird-ldap-3.png | The required settings for LDAP | | Thunderbird-ldap-3.png | The required settings for LDAP |
| Thunderbird-ldap-4.png | Selecting the new LDAP server | | Thunderbird-ldap-4.png | Selecting the new LDAP server |
| </gallery>
| |
|
| |
| ==Microsoft Outlook==
| |
| <!--
| |
| {|
| |
| |'''Set up a new Account'''
| |
|
| |
| If you're starting up Outlook for the first time, you'll see a new e-mail account wizard pop up. Otherwise, create a new e-mail account by selecting '''E-mail Accounts''' from the '''Tools''' menu.
| |
|
| |
| Click '''Add a new e-mail account''' and then click '''Next'''.
| |
| |<br/>[[Image:outlook0.JPG]]<br/><br/>
| |
| |-
| |
| |Under '''Server Type''', select '''IMAP''' to use IMAP for your incoming mail or '''POP3''' to use POP. Other server types are not supported by CSEE.
| |
|
| |
| Click '''Next''' to continue.
| |
| |<br/>[[Image:outlook1.JPG]]<br/><br/>
| |
| |-
| |
| |Under '''User Information''', enter your full name for '''Your Name''' and your CSEE e-mail address for '''E-mail address'''.
| |
|
| |
| Under '''Server Information''', enter "imap.cs.umbc.edu" for '''Incoming mail server (IMAP/POP)''' (use this address for both POP and IMAP) and enter "smtp.cs.umbc.edu" for '''Outgoing mail server (SMTP)'''.
| |
|
| |
| Under '''Logon Information''', enter your login name for '''User Name''' and your login password for '''Password'''.
| |
|
| |
| Click on '''More Settings'''.
| |
| |<br/>[[Image:outlook2.JPG]]<br/><br/>
| |
| |-
| |
| |Click the '''Outgoing Server''' tab.
| |
|
| |
| Check the box that says '''My outgoing server (SMTP) requires authentication.'''
| |
|
| |
| Make sure '''Use same settings as my incoming mail server''' is selected.
| |
| |<br/>[[Image:outlook3.JPG]]<br/><br/>
| |
| |-
| |
| |Click the '''Advanced''' tab.
| |
|
| |
| Under '''Server Port Numbers''', for both '''Incoming Server (IMAP/POP)''' and '''Outgoing Server (SMTP)''', check the boxes that says '''The server requires an encrypted connection (SSL).'''
| |
|
| |
| If you're using IMAP, make sure the '''Incoming Server''' port number is set to 993. If you're using POP, make sure it's set to 995.
| |
|
| |
| Make sure the '''Outgoing Server''' port number is set to 25.
| |
|
| |
| Click '''OK''' to close the More Settings dialog, and then click '''Next'''.
| |
|
| |
| You are now configured to use CSEE mail services!
| |
| |<br/>[[Image:outlook4.JPG]]<br/><br/>
| |
| |}
| |
| -->
| |
| These are the steps to add an account to Outlook 2013 with Outlook having not been configured before.
| |
| # On the welcome screen click "Next" [[:Image:Outlook2013-1.PNG|[1]]]
| |
| # Make sure that "Yes" is selected and select "Next" [[:Image:Outlook2013-2.PNG|[2]]]
| |
| # Select "Manual setup or additional server types" and click "Next" [[:Image:Outlook2013-3.PNG|[3]]]
| |
| # Select "POP or IAMP" and click "Next" [[:Image:Outlook2013-4.PNG|[4]]]
| |
| # Fill in the required boxes [[:Image:Outlook2013-5.PNG|[5]]]
| |
| #* Under "Server Information"
| |
| #*: Account Type: "IMAP"
| |
| #*: Incoming mail server: "imap.cs.umbc.edu"
| |
| #*: Outgoing mail server (smtp): "smtp.cs.umbc.edu"
| |
| #* Logon:
| |
| #*: User Name: (just your usename, no @cs.umbc.edu)
| |
| #*: Password: (your password)
| |
| # Click "More Settings ..."
| |
| # Pick the "Outgoing Server" tab [[:Image:Outlook2013-6.PNG|[6]]]
| |
| #* Check "My outgoing server..."
| |
| #* Select "Log on using" and fill in your user name and password
| |
| # Pick the "Advanced" tab [[:Image:Outlook2013-7.PNG|[7]]]
| |
| # Change "Incoming server (IMAP)" to: 993
| |
| #* Change the drop down below it to say SSL
| |
| # Leave "Outgoing server (SMTP)" at 25
| |
| #* Change the drop down below it to say "TLS"
| |
| # Click "OK" and return to the Add account form and click "Next"
| |
| #* If everything has been completed successfully both tasks should say "Completed" [[:Image:Outlook2013-8.PNG|[8]]]
| |
| Your all set!
| |
|
| |
| <gallery>
| |
| File: Outlook2013-1.PNG | Welcome Screen
| |
| File: Outlook2013-2.PNG | Configure email?
| |
| File: Outlook2013-3.PNG | Automatic or Manual
| |
| File: Outlook2013-4.PNG | Email type selection
| |
| File: Outlook2013-5.PNG | Server Settings
| |
| File: Outlook2013-6.PNG | Outgoing server settings
| |
| File: Outlook2013-7.PNG | Advanced Settings
| |
| File: Outlook2013-8.PNG | Testing your settings
| |
| </gallery>
| |
|
| |
| ===Adding LDAP support===
| |
| Adding LDAP support allows Outlook to auto-complete email address of people who are in the UMBC system.
| |
| # Click on the "FIle" tab, select the "Account Settings" dropdown and click "Account Settings..." [[:File: outlook-ldap-1.png|[1]]]
| |
| # Select the "Address books" tab and click "New..." [[:File: outlook-ldap-2.png|[2]]]
| |
| # Select "Internet Directory Service (LDAP)" and click "Next" [[:File: outlook-ldap-3.png|[3]]]
| |
| # Enter "directory.umbc.edu" in the "Server Name" field [[:File:outlook-ldap-4.png|[4]]]
| |
| # Click "Next"
| |
| # When it tells you that "You must restart Outlook for these changes to take effect" click "OK"
| |
| # Click "Finish"
| |
| That's its, you are all set up for LDAP.
| |
|
| |
| <gallery>
| |
| File: outlook-ldap-1.png | Accessing the Account Settings
| |
| File: outlook-ldap-2.png | Adding a new Internet Address Book
| |
| File: outlook-ldap-3.png | Selecting a "LDAP" Address Book
| |
| File: outlook-ldap-4.png | Information to enter
| |
| </gallery> | | </gallery> |
|
| |
|
Overview
The CSEE mail servers use a secure connection for incoming and outgoing mail; so you will need to customize your mail client in order to read and send e-mail on your CSEE account. This page explains how to configure your e-mail client for the CSEE Mail Services. This page will discuss Thunderbird and Microsoft Outlook If you use a different client, please refer to your client's documentation. You will need to set up your client for the following services:
| Service
|
Server name
|
Port
|
| Secure IMAP
|
imap.cs.umbc.edu
|
993
|
| Secure POP
|
imap.cs.umbc.edu
|
995
|
| Secure SMTP
|
smtp.cs.umbc.edu
|
25
|
Thunderbird (Windows/MacOS/Linux)
- If you have no email accounts configured the 'New Account' dialog will automatically open. [1]
If you already have accounts in Thunderbird and are simply adding CSEE mail to Thunderbird open the 'New Account' dialog by clicking on the 3 horizontal bars (menu button) and select 'Preferences' -> 'Account Settings...' then 'Account Options' -> 'Add Mail Account' [2]
- Fill in your name, csee username and your password. Thunderbird will attempt to automatically detect the proper settings, but it will not work. Manually, change the settings. [3]
|
|
Server Hostname
|
Port
|
SSL
|
Authentication
|
| IMAP |
imap.cs.umbc.edu |
993 |
SSL/TLS |
Normal Password
|
| SMTP |
smtp.cs.umbc.edu |
587 |
STARTLS |
Normal Password
|
- If the 'Done' box becomes grayed out, click in one of the 'Authentication' boxes and select 'Normal Password' again. This should re-enable the button.
Email is now set up--check for new messages by clicking the "Get Mail" button.
-
New Account dialog when no accounts are configured
-
How to access the New Account dialog with existing accounts are in Thunderbird
-
All the settings in their respective fields
Adding LDAP support
Adding LDAP support allows Thunderbird to auto-complete email address of people who are in the UMBC system.
- Access the menu, the three horizontal bars in the upper right -> preferences -> preferences [1]
- Select the "Composition" tab and then the "Addressing" sub-tab. Click on "Edit Directories..." [2]
- Select "Add" to add a new LDAP server.
- Fill in the following information [3]
- Name: UMBC LDAP
- Hostname: directory.umbc.edu
- Base DN: dc=umbc,dc=edu
- Click "OK" on the "Directory Server Properties" window
- Click "OK" on the "LDAP Directory Servers" window
- Make sure that the checkbox next to "Directory Server" is checked and make sure that the drop down says "UMBC LDAP" [4]
- Click "OK"
That's its, you are all set up for LDAP
-
Accessing the preferences
-
The "Addressing" sub-tab under the "Composition" tab
-
The required settings for LDAP
-
Selecting the new LDAP server
Alpine
Alpine's default access method uses direct access to your mail spool in /var/mail. A bug in Linux prevents this from actually working. The solution is to manually configure alpine to use IMAP.
Edit the line beginning with inbox-path= and the line beginning with folder-collections= in ~/.pinerc (replace USERNAME with your UMBC username):
inbox-path={imap.cs.umbc.edu/user=USERNAME/ssl/NoRsh/IMAP}inbox
folder-collections=Mail {imap.cs.umbc.edu/user=USERNAME/ssl/NoRsh}[]
Alpine can also use the UMBC LDAP server to search for names and email addresses. This support can be added by editing the line beginning with ldap-servers= in ~/.pinerc (this is all one line):
ldap-servers=directory.umbc.edu:389 "/base=dc=umbc,dc=edu/binddn=/impl=0/rhs=0/ref=0/nosub=0/tls=0/tlsm=0/type=/srch=/time=/size=/cust=/nick=/matr=/catr=/satr=/gatr="
Every time alpine is run, a prompt will ask for your password to be entered.
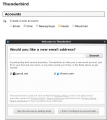 New Account dialog when no accounts are configured
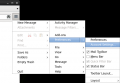 How to access the New Account dialog with existing accounts are in Thunderbird
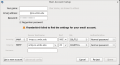 All the settings in their respective fields


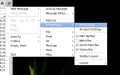 Accessing the preferences
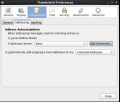 The "Addressing" sub-tab under the "Composition" tab
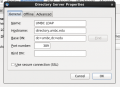 The required settings for LDAP
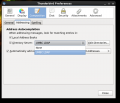 Selecting the new LDAP server


